Posts

Showing posts from 2013

Parameterization in Jmeter

Image
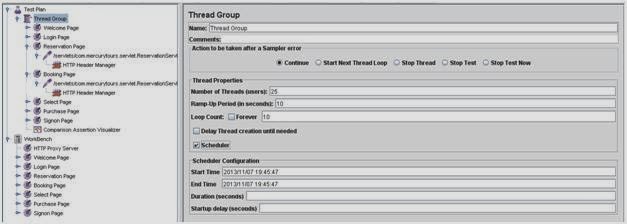
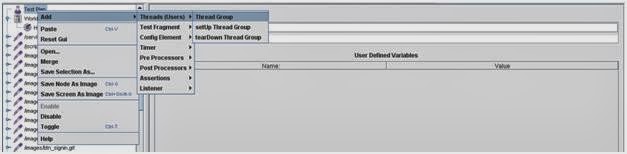
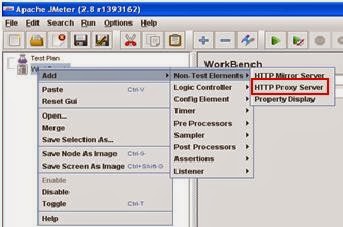
Parameterization in Jmeter: We parameterize the input to run the test with different set of data for each user. We will provide the data in a file and provide as input for a field. For this we will create a .csv file in Excel and save it. For this example, we will parameterize four fields. They are fromPort, toPort, passFirst0 and passLast0.  The details to corresponding fields are as follows: We have our requests as shown below: To add the data to the test we need to add the config element as below: Right Click on Thread Group -> Add -> Config Element -> CSV Data Set Config The CSV Data Set details were entered as follows: Parameters for the CSV Data Set config is as below: Attribute Description Required Name Descriptive name for this element that is shown

Load Test in Jmeter

Image
Starting a Load Test in Jmeter: To Start a Load Test we set the settings in Thread Group. For example we want to test for 25 users with 10 iterations each. Parameters in Thread Group (As shown in help): Attribute Description Required Name Descriptive name for this element that is shown in the tree. No Action to be taken after a Sampler error Determines what happens if a sampler error occurs, either because the sample itself failed or an assertion failed. The possible choices are: Continue - ignore the error and continue with the test Start Next Loop - ignore the error, start next loop and continue with the test Stop Thread - current thread exits Stop

Defining Transactions and Inserting Assertions in Jmeter

Image
Defining Transactions and Inserting Assertions in Jmeter: To define transactions in Jmeter we use Simple Controller. The Simple Logic Controller lets you organize your Samplers and other Logic Controllers. Unlike other Logic Controllers, this controller provides no functionality beyond that of a storage device. To add Simple Controller, Right Click on Work Bench, click on Add-> Logic Controller -> Simple Controller as shown below In our application,we have the below transactions: 1.        Welcome Page 2.        Login Page 3.        Reservation Page 4.        Booking Page 5.        Select Page 6.        Purchase Page 7.        Signon Page Each request which is recorded is kept under each Simple Controller by drag and drop and select Add as Child as shown below: Follow the above step for all the transactions. The final screenshot after addition of transactions is shown below: Now let us verify the recorded script. Go to Test Plan

Verifying the script recorded in Jmeter

Image
Steps to create a Testplan and verify the scripts: Once we recorded using the HTTP Proxy the flow using workbench, lets make sure that the recorded flow is working. Note: Before recording, always start the proxy then record the flow and stop the proxy. To make sure the recorded scripts are working, we need to go to TestPlan. Add Thread Group by Right Clicking on Test Plan then Add ->Threads (Users) -> Thread Group. This is shown below:   Initially the Thread Group screen will be as below: We will come to the details in later post. Since we are going to verify the correctness of our scripts we will run with the default users i.e.1 user. Copy the requests under Thread Group from HTTP Proxy server as shown below, and then only the script creation is complete. If the requests are under Workbench we will not be able to run them. Only when the requests are under thread group we can execute them. To verify the script is running properly we ne

Recording using HTTP Proxy in Jmeter

Image
Configuring a proxy in Jmeter: The first step before recording a script let’s configure a proxy in WorkBench. WorkBench : The WorkBench simply provides a place to temporarily store test elements while not in use, for copy/paste purposes, or any other purpose you desire. When you save your test plan, WorkBench items are not saved with it. Your WorkBench can be saved independently if you like. The HTTP(S) proxy server (prior to Version 2.10) or HTTP(S) Test Script Recorder (Version 2.10 onwards) allows JMeter to intercept and record your actions while you browse your web application with your normal browser. JMeter will create a test sample objects and stores them directly into your test plan as you go. The recorder is implemented as an HTTP(S) proxy server. You need to set up your browser use the proxy for all HTTP and HTTPS requests. [Do not use JMeter as the proxy for any other request types - FTP, etc. - as JMeter cannot handle them.] Launch Jmeter. To use the reco

Perform the Same action multiple times with different parameters

Image
Sometimes we might want to perform the same action multiple times with different parameters. The following is a basic example of how to do this in LoadRunner. In this example we have three different Parameters {Param_1}, {Param_2} and {Param_3} as shown. The following script will perform three searches on google.co.in using above three different parameters. Action() {             int i;             char temp[10];             // Progress Through 3 Parameters stored in {Param_1}, {Param_2} and {Param_3}             for(i=1;i<4;i++) {             //stores the output like {Param_1} to variable temp                         sprintf(temp,"{Param_%d}",i ); //To print the value of temp lr_message("print %s",temp ); //Evaluate the temp and store the value in Param_value                         lr_save_string(lr_eval_string(temp), "Param_value");                         lr_start_transaction("Se