Running Load Test in Jmeter for Webservices
Once we have completed the scripting for required flows. We need to design a scenario according to the NFRs and execute the test in Jmeter to obtain results for our Load test.
Let us see how this can be achieved in Jmeter for the previously webservices with 4 threads to be Load tested.
- Creation of the Scenario file and defining them in the Thread group:
Let us create a Scenario.csv file with below details and save it.
sc0=0_DataFolder:1_NumberOfThreads:2_RampUp_sec:3_LoopCount:4_Duration_sec:5_StartUpDelay_sec:6_UserThinkTime_ms:7_Throughput_spm
sc1=SC1_1USR:1:30:1:36000:0:1000:2.5
sc2=SC2_5USR:1:30:1:36000:60:1000:1.67
sc3=SC3_1USR:1:30:1:36000:120:1000:1.2
sc4=SC4_5USR:1:30:1:36000:240:1000:5.1
The above file is a csv file which has details of the following:
0_DataFolder : where the xml files and csv files required are kept
1_NumberOfThreads : Defines the number of users.
2_RampUp_sec : value for the Ramp-up Period (in Sec).
3_LoopCount : value for LoopCount
4_Duration_sec : value for Duration (Sec) under Scheduler
5_StartUpDelay_sec : value for Startup delay (Sec) under Scheduler
The above values #1 to #5 will be referenced under Thread properties of Thread Group as below:

Note:
Under Scheduler we have the below:
Start Time
An absolute start time is given here. When you start your test, JMeter will wait until the specified start time to begin testing. The Startup Delay field over-rides Start Time
End Time
An absolute end time is given here. When you start your test, JMeter will wait until the specified start time to begin testing, and it will stop at the specified end time. The Duration field over-rides End Time
Duration (seconds)
We can choose a relative end time using this field. JMeter will use this to calculate the End Time, and ignore the End Time value.
Startup delay (seconds)
We can choose a relative startup delay using this field. JMeter will use this to calculate the Start Time, and ignore the Start Time value.
7_Throughput_spm : value for throughput. This value is determined according to NFR.
E.g: 2.5 is the defined value in sc1. So transactions in hour will be:
2.5*60 = 150. This xml will be injected 150 times in duration of 1hr test.
This value is referred in “Constant Throughput Timer” as below: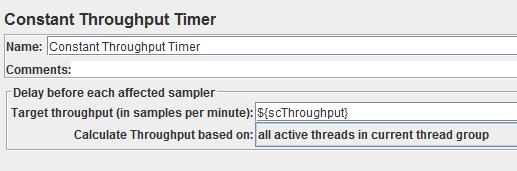
The below lines for example are added in the BeanShell sampler which is under “Only Once Controller”
vars.put("scId",String.valueOf(vars.get("sc1")).split(":")[0]);
vars.put("scThinkTime",String.valueOf(vars.get("sc1")).split(":")[6]);
vars.put("scThroughput",String.valueOf(vars.get("sc1")).split(":")[7]);
- Creation of the Test Plan:
The overall test plan is as below:
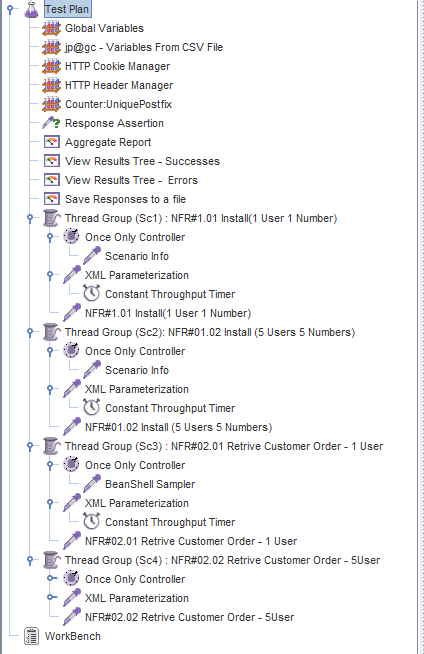
Note: We have used “jp@gc - Variables From CSV File” plugin to read the values from the scenario.csv which is created in Step#1.
This plugin can be obtained from http://jmeter-plugins.org/
All other components which are added in the test plan are self-explanatory.
- Execution of the Test Plan:
We can run the test plan either using Jmeter GUI or as Non-GUI mode:
- Jmeter GUI mode:
- Just click on Start button in the toolbox (or)
- Menu Run - > Start (or)
- Ctrl+R will run the Load Test
- To start test using command line (Non-GUI mode):
Just enter the below command from Jmeter/bin folder.
~\JMeter\apache-jmeter\bin>jmeter -n -t "~\Tests\JMX\LoadTest.jmx" -l "~\Logs\GenerateLog.jtl"

Comments
Post a Comment